|
CodeLab UI Elements
How to access your UI Elements in the Render loop
Before Paint.NET calls your Render function, it preloads the Amount1, Amount2,... AmountX variables with the current control settings that have been adjusted by the user. Typically, in the Render function that you write, you simply need to use the AmountX variables and they will contain the appropriate data.
Let's take a look at the following controls:
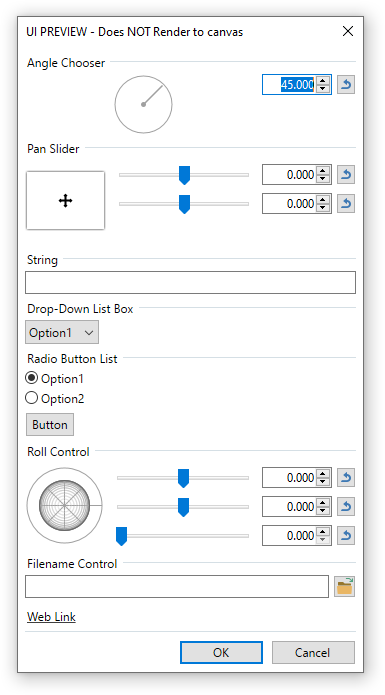
Now, let's look at some sample code to utilize each control type. (Each of the following CodeLab scripts work and all unnecessary code has been removed.)
Integer Slider
When the Render function starts, the Amount1 integer variable contains the number entered by the user.
#region UICode
IntSliderControl Amount1 = 128; // [0,255] Tolerance
#endregion

private UnaryPixelOps.Desaturate desaturateOp = new UnaryPixelOps.Desaturate();

void Render(Surface dst, Surface src, Rectangle rect)
{
   ColorBgra CurrentPixel;
   for (int y = rect.Top; y < rect.Bottom; y++)
   {
      for (int x = rect.Left; x < rect.Right; x++)
      {
         CurrentPixel = desaturateOp.Apply(src[x,y]);
         if (CurrentPixel.R > Amount1)
         {
            CurrentPixel = ColorBgra.Black;
         }
         else
         {
            CurrentPixel = ColorBgra.White;
         }
         dst[x,y] = CurrentPixel;
      }
   }
}
Check Box
When the Render function starts, the Amount1 boolean variable contains true if the check box is checked and false if it is clear.
#region UICode
CheckboxControl Amount1 = false; // Use Secondary Color
#endregion

void Render(Surface dst, Surface src, Rectangle rect)
{
   ColorBgra PrimaryColor = (ColorBgra)EnvironmentParameters.PrimaryColor;
   ColorBgra SecondaryColor = (ColorBgra)EnvironmentParameters.SecondaryColor;

   ColorBgra CurrentPixel;
   for (int y = rect.Top; y < rect.Bottom; y++)
   {
      for (int x = rect.Left; x < rect.Right; x++)
      {
         CurrentPixel = PrimaryColor;
         if (Amount1)
         {
            CurrentPixel = SecondaryColor;
         }
         dst[x,y] = CurrentPixel;
      }
   }
}
Color Wheel
When the Render function starts, the Amount1 ColorBgra variable contains the selected color. The default color for this control is taken from the current primary color as specified in the color docker window. If two color wheels are included in your UI, the second color wheel will default to the secondary color as specified in the color docker window.
#region UICode
ColorWheelControl Amount1 = ColorBgra.FromBgr(255, 255, 0); // Tint
#endregion

private UnaryPixelOps.Desaturate desaturateOp = new UnaryPixelOps.Desaturate();
private UserBlendOps.MultiplyBlendOp MultOp = new UserBlendOps.MultiplyBlendOp();

void Render(Surface dst, Surface src, Rectangle rect)
{
   ColorBgra CurrentPixel;
   for (int y = rect.Top; y < rect.Bottom; y++)
   {
      for (int x = rect.Left; x < rect.Right; x++)
      {
         CurrentPixel = desaturateOp.Apply(src[x,y]);
         CurrentPixel = MultOp.Apply(CurrentPixel, Amount1);
         dst[x,y] = CurrentPixel;
      }
   }
}
Also, note that you can access the R, G, B, and A elements of the Amount1 color individually by using Amount1.R, Amount1.G, Amount1.B, or Amount1.A since Amount1 is a ColorBgra variable type.
Angle Chooser
When the Render function starts, the Amount1 double variable contains a decimal value from -180.0 to 180.0 with a default of 45.0.
#region UICode
AngleControl Amount1 = 45; // [-180,180] Direction
IntSliderControl Amount2 = 10; // [0,100] Distance
#endregion

void Render(Surface dst, Surface src, Rectangle rect)
{
    // Find center pixel of selection
    Rectangle selection = EnvironmentParameters.SelectionBounds;
    int CenterX = ((selection.Right - selection.Left) / 2) + selection.Left;
    int CenterY = ((selection.Bottom - selection.Top) / 2) + selection.Top;

    // Calculate offset of second pixel from direction and distance
    int XOffset = (int)(Math.Round(Math.Sin(Math.PI * (Amount1+90) / 180.0)) * Amount2);
    int YOffset = (int)(Math.Round(Math.Cos(Math.PI * (Amount1+90) / 180.0)) * Amount2);

    for (int y = rect.Top; y < rect.Bottom; y++)
    {
        for (int x = rect.Left; x < rect.Right; x++)
        {
            ColorBgra CurrentPixel = src[x,y];

            // Color the center pixel blue
            if (CenterX == x && CenterY == y) CurrentPixel = ColorBgra.Blue;

            // Color the offset pixel red
            if (CenterX + XOffset == x && CenterY + YOffset == y) CurrentPixel = ColorBgra.Red;

            dst[x,y] = CurrentPixel;
        }
    }
}
Double Vector
This one is a little more complicated to use. When the Render function starts, the Amount1 structure contains two double variables, one for each slider.
Each "double" variable has a range of -1.0 to +1.0 where -1.0 represents the left (or top) of the canvas, 0 represents the center, and +1.0 represents the right (or bottom) of the canvas.
// Author: Curtis
#region UICode
PanSliderControl Amount1 = Pair.Create(0.0,0.0); // Position
#endregion

void Render(Surface dst, Surface src, Rectangle rect)
{
   Rectangle selection = EnvironmentParameters.SelectionBounds;
   ColorBgra PrimaryColor = EnvironmentParameters.PrimaryColor;

   int width = selection.Right - selection.Left;
   int height = selection.Bottom - selection.Top;

   // converts the Pair values to between 0 and 1
   // where 0 is the left/top and 1 is the right/bottom.
   double px = (Amount1.First + 1) / 2;
   double py = (Amount1.Second + 1) / 2;

   // we can now convert these to actual pixel co-ordinates.
   int column = (int)Math.Round(px * width);
   int row = (int)Math.Round(py * height);

   for (int y = rect.Top; y < rect.Bottom; y++)
   {
      for (int x = rect.Left; x < rect.Right; x++)
      {
         if (x == column || y == row)
         {
            dst[x,y] = PrimaryColor;
         }
         else
         {
            dst[x,y] = src[x,y];
         }
      }
   }
}
Double Slider
When the Render function starts, the Amount1 double variable contains the value entered by the user. This works exactly the same as the integer slider, except that in this case the value returned is of the double type.
#region UICode
double Amount1 = 10.0; // [10.0,100.0] Zoom
#endregion

unsafe void Render(Surface dst, Surface src, Rectangle rect)
{
   for (int y = rect.Top; y < rect.Bottom; y++)
   {
      for (int x = rect.Left; x < rect.Right; x++)
      {
         int u = 2 * x - dst.Width;
         int v = 2 * y - dst.Height;
         double r = Math.Sqrt(u*u + v*v) / Amount1;
         double t = Math.Atan2(v,u);
         t = Math.Sin(t) * Math.Cos(r) * Math.PI;
         dst[x,y] = ColorBgra.FromBgraClamped(
            (int)(128 + 127 * Math.Sin(r+t)),
            (int)(128 + 127 * Math.Sin(Math.PI/2+r+t)),
            (int)(128 + 127 * Math.Sin(Math.PI+r+t)),
            255);
      }
   }
}
Drop-Down List Box
When the Render function starts, the Amount1 byte variable contains the a value corresponding to the item chosen by the user. The list is zero based--that is, the first item in the list will return 0, the second item will return 1...
#region UICode
ListBoxControl Amount1 = 0; // Fill with|Primary Color|Secondary Color
#endregion

void Render(Surface dst, Surface src, Rectangle rect)
{
   ColorBgra PrimaryColor = (ColorBgra)EnvironmentParameters.PrimaryColor;
   ColorBgra SecondaryColor = (ColorBgra)EnvironmentParameters.SecondaryColor;
   ColorBgra CurrentPixel;
   for (int y = rect.Top; y < rect.Bottom; y++)
   {
      for (int x = rect.Left; x < rect.Right; x++)
      {
         CurrentPixel = src[x,y];
         switch(Amount1)
         {
            case 0: // Primary Color chosen
               CurrentPixel = PrimaryColor;
               break;
            case 1: // Secondary Color chosen
               CurrentPixel = SecondaryColor;
               break;
         }
         dst[x,y] = CurrentPixel;
      }
   }
}
In this example, "Fill with" becomes the drop-down box label, "Primary Color" becomes the first option (Amount1=0), and "Secondary Color" becomes the second option (Amount1=1).
BlendOp Types
When the Render function starts, the Amount1 UserBlendOp variable contains a blend operator selected by the user. The blend op can be used this way:
#region UICode
UserBlendOp Amount1 = new UserBlendOps.NormalBlendOp();// Blend Primary Color
#endregion

void Render(Surface dst, Surface src, Rectangle rect)
{
   ColorBgra PrimaryColor = (ColorBgra)EnvironmentParameters.PrimaryColor;
   ColorBgra CurrentPixel;
   for (int y = rect.Top; y < rect.Bottom; y++)
   {
      for (int x = rect.Left; x < rect.Right; x++)
      {
         CurrentPixel = src[x,y];
         // Blend the Primary Color with the source canvas
         dst[x,y] = Amount1.Apply(CurrentPixel, PrimaryColor);
      }
   }
}
Here, the Amount1.Apply function takes two parameters. The first parameter is the "left hand side" of the blend and the second parameter is the "right hand side". The user selects the actual blend method from your effect's user interface. You need to think about how your result pixel will look. Switching the order of the supplied parameters makes a big difference.
String
When the Render function starts, the Amount1 string variable contains the string value entered by the user.
It might be good to combine this control with the Font Names control...
Font Names
When the Render function starts, the Amount1 FontFamily variable contains the selected font family.
// Author: Ego Eram Reputo
#region UICode
FontFamily Amount1 = new FontFamily("Arial"); // Font
#endregion

void Render(Surface dst, Surface src, Rectangle rect)
{
   Rectangle selection = EnvironmentParameters.SelectionBounds;
   ColorBgra PC = (ColorBgra)EnvironmentParameters.PrimaryColor;
   // Reset the destination canvas
   for (int y = rect.Top; y < rect.Bottom; y++)
   {
      for (int x = rect.Left; x < rect.Right; x++)
      {
         dst[x,y] = src[x,y];
      }
   }
   // Create a brush and graphics surface to write on
   SolidBrush Brush1=new SolidBrush(Color.FromArgb(PC.A,PC.R,PC.G,PC.B));
   Graphics g = new RenderArgs(dst).Graphics;
   g.SmoothingMode = System.Drawing.Drawing2D.SmoothingMode.AntiAlias;
   g.Clip = new Region(rect);
   // Create a font from user selection
   Font SelectedFont;
   try
   {
     SelectedFont=new Font(Amount1.Name, 16);
   }
   else
   {
     SelectedFont=new Font("Arial", 16);
   }
   // Write our text to the canvas
   g.DrawString("Paint.NET Rocks!", SelectedFont, Brush1, selection.Left, selection.Top);
}
Notice in this example, we need to reset the dst canvas with the src canvas BEFORE we write our strings to the dst canvas. This is because writing strings does not write to every single pixel on the dst canvas. And, this is something that we need to be sure to do! So, before we write the strings we copy the entire src canvas to the dst canvas.
Radio Button List
When the Render function starts, the Amount1 byte variable contains the a value corresponding to the item chosen by the user. The list is zero based--that is, the first item in the list will return 0, the second item will return 1...
#region UICode
RadioButtonControl Amount1 = 0; // Delete|White|Black
#endregion

private UnaryPixelOps.Desaturate desaturateOp = new UnaryPixelOps.Desaturate();

void Render(Surface dst, Surface src, Rectangle rect)
{
   ColorBgra CurrentPixel;
   for (int y = rect.Top; y < rect.Bottom; y++)
   {
      for (int x = rect.Left; x < rect.Right; x++)
      {
         CurrentPixel = desaturateOp.Apply(src[x,y]);
         switch(Amount1)
         {
            case 0: // White chosen
               CurrentPixel.A = (byte)(255-CurrentPixel.R);
               CurrentPixel.R = 0;
               CurrentPixel.G = 0;
               CurrentPixel.B = 0;
               break;
            case 1: // Black chosen
               CurrentPixel.A = CurrentPixel.R;
               CurrentPixel.R = 255;
               CurrentPixel.G = 255;
               CurrentPixel.B = 255;
               break;
         }
         dst[x,y] = CurrentPixel;
      }
   }
}
In this example, "Delete" becomes the list label, "White" becomes the first option (Amount1=0), and "Black" becomes the second option (Amount1=1).
Reseed Button/Random Numbers
When the Render function starts, the Amount2 byte variable contains the a value corresponding to the number of times the user has pressed the Reseed button. To use random numbers, you'll need to use the RandomNumber class as shown in this example:
#region UICode
ColorWheelControl Amount1 = ColorBgra.FromBgr(0, 0, 0); // Base Color
ReseedButtonControl Amount2 = 0; // Reseed
#endregion

void Render(Surface dst, Surface src, Rectangle rect)
{
   ColorBgra CurrentPixel;
   for (int y = rect.Top; y < rect.Bottom; y++)
   {
      for (int x = rect.Left; x < rect.Right; x++)
      {
         CurrentPixel = src[x,y];
         if (RandomNumber.Next(255) > 128)
         {
            CurrentPixel = Amount1;
         }
         else
         {
            CurrentPixel.R = (byte)RandomNumber.Next(256);
            CurrentPixel.G = (byte)RandomNumber.Next(256);
            CurrentPixel.B = (byte)RandomNumber.Next(256);
         }
         CurrentPixel.A = (byte)255;

         dst[x,y] = CurrentPixel;
      }
   }
}
In this example, you pretty much ignore Amount2 as it is only there for housekeeping. The real work is done behind the sceens where the RandomNumber is setup for you and seeded using the Amount2 variable. You juse need to use RandomNumber.Next(n) or RandomNumber.Next(m,n) to get a series of random numbers.* Each time your effect runs, it will give the same series of random numbers unless the user presses the Reseed button (then a new list is generated). The reason behind this is simple, you want a consistant view if the user is adjusting another control (like the color wheel in this example).
*Random numbers are returned in the range of (0 < random number < n) or (m < random number < n) so calling RandomNumber(256) will return a random number between 0 and 255, inclusive.
Current and Default Palette Access
You can load the contents of the Current or Default palette into an array using the following example:
var CurrentColors = Services.GetService().CurrentPalette
           .Take(96) // specify how many colors you want (1-96)
		   .Select(x => x.ToColor()) // convert ColorBgra into Color
		   .ToArray();

var DefaultColors = Services.GetService().DefaultPalette
           .Take(96)
		   .Select(x => x.ToColor())
		   .ToArray();
Now that you have your palette into an array, use that array with the following function to find the nearest color:
Color FindNearestColor(Color color, Color[] palette)
{
    int minDistanceSquared = int.MaxValue;
    byte bestIndex = 0;
    for (byte i = 0; i < palette.Length; i++)
    {
        int Rdiff = color.R - palette[i].R;
        int Gdiff = color.G - palette[i].G;
        int Bdiff = color.B - palette[i].B;
        int distanceSquared = Rdiff * Rdiff + Gdiff * Gdiff + Bdiff * Bdiff;
        if (distanceSquared < minDistanceSquared)
        {
            minDistanceSquared = distanceSquared;
            bestIndex = i;
            if (minDistanceSquared < 1) break; // found exact match
        }
    }
    return palette[bestIndex];
}
More Information
Here is some more information that you may find useful:
Designing a User Interface for Your Effect
CodeLab Effects Design Overview
Using the Code Editor
Building a DLL File
CodeLab Help File
Check for CodeLab Updates
Learn C#
|
|
|
News
Sudoku 1.1 Released
(October 19, 2025)
Solve sudoku puzzles for fun! Over 280 puzzles at all levels included.
More...
CodeLab 6.13 Released
(November 17, 2024)
This latest release of CodeLab for Paint.NET includes the
ability to write GPU accelerated plugins.
More...
Double-Six Dominoes 3.1
(May 10, 2021)
This long-awaited refresh of the most popular dominoes game
on Download.com is now available!
More...
|
|
|
|
|
|