|
CodeLab Tutorial Part 4 - Odds and Ends
How to use CodeLab to its fullest!
If you haven't already done so, please go back and review the following:
Part 1 - Simple
Part 2 - Intermediate
Part 3 - Complex
Back? OK, good. Now that you've mastered those effects, it is time to move on to something a little more off the wall.
Part 4 - Odd Stuff
If you've been following along so far, you have learned a great deal about how plugins work and are put together. But, you may have some ideas for plugins that just don't fit the normal mold. For example, you understand that a plugin must write to every pixel in the destination canvas... but, what if you don't want to write to every pixel? Like, say, rendering text on the canvas or drawing lines/shapes? Well, we can also do this type of thing with CodeLab.
I have also included here some other tips and tricks that I have learned along the way. Most of the scripts here I wrote myself and some I did not. I have collected these ideas here in one place so that you and I could find them easily when getting ready to write a plugin.
Look through the sections below. I hope you find something here that is useful to you.
Text
Rendering text to the image is interesting because when you are rendering text, not every pixel is written.
In order for this to work properly, we must ensure that every pixel is written to the destination canvas. The easiest way to do that is to copy all pixels from Src to Dst, then render the text to the Dst canvas.
Let's start with the default script:
#region UICode
int Amount1=0;	//[0,100]Slider 1 Description
int Amount2=0;	//[0,100]Slider 2 Description
int Amount3=0;	//[0,100]Slider 3 Description
#endregion

void Render(Surface dst, Surface src, Rectangle rect)
{
    // Delete any of these lines you don't need
    Rectangle selection = EnvironmentParameters.GetSelection(src.Bounds).GetBoundsInt();
    int CenterX = ((selection.Right - selection.Left) / 2)+selection.Left;
    int CenterY = ((selection.Bottom - selection.Top) / 2)+selection.Top;
    ColorBgra PrimaryColor = (ColorBgra)EnvironmentParameters.PrimaryColor;
    ColorBgra SecondaryColor = (ColorBgra)EnvironmentParameters.SecondaryColor;
    int BrushWidth = (int)EnvironmentParameters.BrushWidth;

    ColorBgra CurrentPixel;
    for (int y = rect.Top; y < rect.Bottom; y++)
    {
        for (int x = rect.Left; x < rect.Right; x++)
        {
            CurrentPixel = src[x,y];
            // TODO: Add pixel processing code here
            // Access RGBA values this way, for example:
            // CurrentPixel.R = (byte)PrimaryColor.R;
            // CurrentPixel.G = (byte)PrimaryColor.G;
            // CurrentPixel.B = (byte)PrimaryColor.B;
            // CurrentPixel.A = (byte)PrimaryColor.A;
            dst[x,y] = CurrentPixel;
        }
    }
}
Well, for this simple example, we won't need any UI controls, so delete those. We also won't need any of the variables (except the first one, selection), so get rid of them. And, since we won't be looping over every single pixel in the destination canvas, you might as well get rid of those inner loops too!
OK, so far, this is what we've got:
#region UICode
#endregion

void Render(Surface dst, Surface src, Rectangle rect)
{
    // Delete any of these lines you don't need
    Rectangle selection = EnvironmentParameters.GetSelection(src.Bounds).GetBoundsInt();

}
The first thing we need to do is make sure that all pixels are copied from the source canvas to the destination canvas. We can do that with a single line of code. Just use CopySurface, like so:
#region UICode
#endregion

void Render(Surface dst, Surface src, Rectangle rect)
{
    Rectangle selection = EnvironmentParameters.GetSelection(src.Bounds).GetBoundsInt();

    dst.CopySurface(src,rect.Location,rect);

}
Now that all the pixels in the destination canvas have been written (copied from the source canvas) we can now write some text on them.
Since we will be using GDI+ to draw the text string to the canvas, we will need to create a few things in order to make it work. We will need a graphics surface, a brush, and a font.
First, let's create a graphics surface out of our destination canvas by using the following code:
Graphics g = new RenderArgs(dst).Graphics;
Remember that Paint.NET breaks up your effect into ROI work units. So, we need to be sure that when drawing our text we don't accidentally write outside of our current work unit. To do that, we need to clip to the current Rectangle of Interest:
g.Clip = new Region(rect);
Next, we need to create a brush in order to write with. We will create a solid brush of a specific color, say red:
SolidBrush Brush1 = new SolidBrush(Color.Red);
Then, we will need to create the font we will be using:
Font SelectedFont = new Font("Arial", 16);
Adding all those lines into our script, it should now look like this:
#region UICode
#endregion

void Render(Surface dst, Surface src, Rectangle rect)
{
    Rectangle selection = EnvironmentParameters.GetSelection(src.Bounds).GetBoundsInt();

    dst.CopySurface(src,rect.Location,rect);
    SolidBrush Brush1 = new SolidBrush(Color.Red);
    Graphics g = new RenderArgs(dst).Graphics;
    g.Clip = new Region(rect);
    Font SelectedFont = new Font("Arial", 16);
}
Now that everything is created, we just need to call the DrawString function in order to write the text to the destination canvas:
#region UICode
#endregion

void Render(Surface dst, Surface src, Rectangle rect)
{
    Rectangle selection = EnvironmentParameters.GetSelection(src.Bounds).GetBoundsInt();

    dst.CopySurface(src,rect.Location,rect);
    SolidBrush Brush1 = new SolidBrush(Color.Red);
    Graphics g = new RenderArgs(dst).Graphics;
    g.Clip = new Region(rect);
    Font SelectedFont = new Font("Arial", 16);
    g.DrawString("Paint.NET Rocks!", SelectedFont, Brush1, selection.Left, selection.Top);
}
And, we're done!
Of course, this is a very simple example and there is much room for improvement. Starting with this simple script, let's take a look at what it would entail to add more options and anti-alias the text.
Anti-Alias Text
Typically, if you don't specify that your text should be rendered with an anti-alias effect it will come out very blocky. In order to anti-alias, just specify the graphics TextRenderingHint.
There are several methods you can choose from in order to anti-alias text. Choose your method and select the corresponding line below to add to your script:
g.TextRenderingHint = System.Drawing.Text.TextRenderingHint.SingleBitPerPixelGridFit;
g.TextRenderingHint = System.Drawing.Text.TextRenderingHint.AntiAliasGridFit;
g.TextRenderingHint = System.Drawing.Text.TextRenderingHint.ClearTypeGridFit;
So, adding to our script, it should now look like this:
#region UICode
#endregion

void Render(Surface dst, Surface src, Rectangle rect)
{
    Rectangle selection = EnvironmentParameters.GetSelection(src.Bounds).GetBoundsInt();

    dst.CopySurface(src,rect.Location,rect);
    SolidBrush Brush1 = new SolidBrush(Color.Red);
    Graphics g = new RenderArgs(dst).Graphics;
    g.Clip = new Region(rect);
    g.TextRenderingHint = System.Drawing.Text.TextRenderingHint.AntiAliasGridFit;
    Font SelectedFont = new Font("Arial", 16);
    g.DrawString("Paint.NET Rocks!", SelectedFont, Brush1, selection.Left, selection.Top);
}
Play with each method to see what they do.
Now that we know how to properly draw text, let's build this simple script into a more full-featured plugin with a user interface and settable parameters:
// Title: BoltBait's Render Text Sample
// Author: BoltBait
// Submenu: Render
// Name: Text
// URL: http://www.BoltBait.com/pdn
#region UICode
string Amount1 = "Test"; // [1,32767] Text
FontFamily Amount2 = new FontFamily("Arial"); // Font
int Amount3 = 12; // [10,72] Size
byte Amount4 = 1; // [1] Smoothing|None|Anti-Alias|ClearType
ColorBgra Amount5 = ColorBgra.FromBgr(0,0,0); // Color
Pair<double, double> Amount6 = Pair.Create( 0.0 , 0.0 ); // Location
#endregion

void Render(Surface dst, Surface src, Rectangle rect)
{
    Rectangle selection = EnvironmentParameters.GetSelection(src.Bounds).GetBoundsInt();
    // Reset the destination canvas
    dst.CopySurface(src,rect.Location,rect);
    // Determine where the text will be written
    int column = (int)Math.Round(((Amount6.First + 1) / 2) * (selection.Right - selection.Left));
    int row = (int)Math.Round(((Amount6.Second + 1) / 2) * (selection.Bottom - selection.Top));
    // Create a brush and graphics surface to write on
    SolidBrush Brush1 = new SolidBrush(Amount5.ToColor());
    Graphics g = new RenderArgs(dst).Graphics;
    // specify smoothing mode
    switch (Amount4)
    {
        case 0: // none
            g.TextRenderingHint = System.Drawing.Text.TextRenderingHint.SingleBitPerPixelGridFit;
            break;
        case 1: // anti-alias
            g.TextRenderingHint = System.Drawing.Text.TextRenderingHint.AntiAliasGridFit;
            break;
        case 2: // cleartype
            g.TextRenderingHint = System.Drawing.Text.TextRenderingHint.ClearTypeGridFit;
            break;
    }
    // Be sure to clip to our ROI
    g.Clip = new Region(rect);
    // Create a font from user selection
    Font SelectedFont;
    try
    {
        SelectedFont = new Font(Amount2.Name, Amount3);
    }
    catch
    {
        // If font creation fails, use Arial font
        SelectedFont = new Font("Arial", Amount3);
    }
    // Write our text to the canvas
    g.DrawString(Amount1, SelectedFont, Brush1, column, row);
}
Anti-Alias Lines/Shapes
Just like when drawing text, when drawing lines and shapes to the canvas, we need to be sure to copy the source canvas to the destination canvas before drawing our stuff.
Then, we need to set the SmoothingMode of the canvas, like this:
g.SmoothingMode = System.Drawing.Drawing2D.SmoothingMode.AntiAlias;
Here is a sample script that will draw 2 lines on the canvas, one aliased and one anti-aliased:
void Render(Surface dst, Surface src, Rectangle rect)
{
    Rectangle selection = EnvironmentParameters.GetSelection(src.Bounds).GetBoundsInt();
    dst.CopySurface(src,rect.Location,rect);
    // create a pen to draw with
    Pen myPen = new Pen(Color.Red);
    myPen.Width = 5;
    // create a GDI+ graphics surface
    Graphics g = new RenderArgs(dst).Graphics;
    g.Clip = new Region(rect);
    // draw a line
    g.SmoothingMode = System.Drawing.Drawing2D.SmoothingMode.None;
    g.DrawLine(myPen,1,1,20,20);
    // now draw a smooth line
    g.SmoothingMode = System.Drawing.Drawing2D.SmoothingMode.AntiAlias;
    g.DrawLine(myPen,20,1,40,20);
}
Once you run this, zoom in and look at the two lines that were drawn. The one on the right is more smooth than the one on the left.
Clipboard
Accessing the clipboard from a Paint.NET plugin is somewhat tricky. Rick explained to me that you can only access the clipboard from an STA thread. Here is a plugin that Illnab1024 wrote to paste from the clipboard into your current selection. If the graphic on the clipboard is smaller than the selection, it will be repeated.
// Author: Illnab1024
#region UICode
#endregion

protected Surface img
{
    get { if (_img != null)
            return _img;
          else
          {
            System.Threading.Thread t = new System.Threading.Thread(new System.Threading.ThreadStart(GetImageFromClipboard));
            t.SetApartmentState(System.Threading.ApartmentState.STA);
            t.Start();
            t.Join();
            return _img;
          }
        }
}
private Surface _img = null;
private void GetImageFromClipboard()
{
    Bitmap aimg = null;
    IDataObject clippy;
    try
    {
        clippy = Clipboard.GetDataObject();
        if (clippy != null)
        {
            aimg = (Bitmap)clippy.GetData(typeof(System.Drawing.Bitmap));
        }
    }
    catch (Exception )
    {
    }
    if (aimg != null)
    {
        _img = Surface.CopyFromBitmap(aimg);
    }
    else
    {
        _img = null;
    }
}

void Render(Surface dst, Surface src, Rectangle rect)
{
    for (int y = rect.Top; y < rect.Bottom; y++)
    {
        for (int x = rect.Left; x < rect.Right; x++)
        {
            if (img == null)
                dst[x,y] = src[x,y];
            else
                dst[x,y] = img.GetBilinearSampleWrapped(x,y);
        }
    }
}
If you'll notice, at the bottom of the code, you'll see your standard Render loops. The first time it tries to read the image from the clipboard, it will be loaded for you.
Reading text from the clipboard is an exercise left up to the reader.
HSV Colors
Usually colors will be accessed in the RGB model by simply accessing the CurrentPixel.R, CurrentPixel.G, and CurrentPixel.B methods. However, sometimes it is desired to access the colors in the HSV model.
In order to convert CurrentPixel into HSV, we do it like this:
// Convert to a standard color
Color col = CurrentPixel.ToColor();
// Convert the color to HSV
HsvColor hsv = HsvColor.FromColor(col);
//  Access the HSV values this way:
int H = hsv.Hue;
int S = hsv.Saturation;
int V = hsv.Value;
Once you are done modifying the H, S, and V values, you can recombine them back to a ColorBgra pixel (the standard Paint.NET pixel type) with the following code:
// Reassemble the H, S, and V into an HSV color
hsv = new HsvColor(H,S,V);
// Put it back into a ColorBgra value for Paint.NET
ColorBgra NewPixel = ColorBgra.FromColor(hsv.ToColor());
NewPixel.A = CurrentPixel.A;  // Retain the original alpha value
From here, you would store NewPixel to the destination canvas so that you can see the result.
Here you can see an example script that uses HSV editing:
// Name: HSV Invert
// Submenu: Color
// Author: BoltBait
// URL: http://www.BoltBait.com
// Keywords: hsv|invert|color
// Title: BoltBait's HSV Quick Invert - v1.0
// Desc: Quickly invert H, S, or V in the HSV color space.
#region UICode
byte Amount1 = 0; // HSV Editing|Invert V|Invert S|Invert H|Maximize S|Maximize V
#endregion

void Render(Surface dst, Surface src, Rectangle rect)
{
    for (int y = rect.Top; y < rect.Bottom; y++)
    {
        if (IsCancelRequested) return;
        for (int x = rect.Left; x < rect.Right; x++)
        {
            ColorBgra CurrentPixel = src[x,y];

            HsvColor hsv = HsvColor.FromColor(CurrentPixel.ToColor());
            int H = hsv.Hue;
            int S = hsv.Saturation;
            int V = hsv.Value;
            byte A = CurrentPixel.A;

            switch (Amount1)
            {
                case 0: V = 100-V;
                    break;
                case 1: S = 100-S;
                    break;
                case 2: H += 180;
                    if (H>360) H -= 360;
                    break;
                case 3: S = 100;
                    break;
                case 4: V = 100;
                    break;
            }

            CurrentPixel = ColorBgra.FromColor(new HsvColor(H,S,V).ToColor());
            CurrentPixel.A = A;

            dst[x,y] = CurrentPixel;
        }
    }
}
Marching Ants / Selection
"Marching Ants" is what I call the selection border because in previous versions of Paint.NET it was indicated by what looked like a line of marching ants. In the current version of Paint.NET, the selection is marked by a solid XOR line. Rick has mentioned that the marching ants may come back at some future time, but that they were removed for performance reasons.
What if you want to apply an effect (or modify) only to those pixels right next to the edge of the selection? For example, let's take a look at my Selection > Outline effect.
Starting with the default script, let's delete anything we don't need. First, remove all the UI controls except the first one. Next, remove all the variables we won't need and the comments inside the inner loop:
#region UICode
int Amount1 = 5; // [1,10] Outline Width
#endregion

void Render(Surface dst, Surface src, Rectangle rect)
{
    ColorBgra CurrentPixel;
    for (int y = rect.Top; y < rect.Bottom; y++)
    {
        for (int x = rect.Left; x < rect.Right; x++)
        {
            CurrentPixel = src[x,y];
            dst[x,y] = CurrentPixel;
        }
    }
}
Next, we will need to create a variable to hold the shape of the selection:
PdnRegion selectionRegion = EnvironmentParameters.GetSelection(src.Bounds);
With this, we can check to see if a pixel is selected by using this code:
if ( !selectionRegion.IsVisible(X, Y) )
Each pixel in our inner loop is located within a selection as Paint.NET will not send you a set of pixels to work on that is not selected. What we need to do is create a loop inside of our inner loop to check the pixels around the current pixel we're working on to see if those pixels are selected or not. If we find a pixel that is not selected we know we're close to the edge of our selection and therefore must replace the current pixel with another one.
Let's add the above code to our script:
#region UICode
int Amount1 = 5; // [1,10] Outline Width
#endregion

void Render(Surface dst, Surface src, Rectangle rect)
{
    PdnRegion selectionRegion = EnvironmentParameters.GetSelection(src.Bounds);
    for (int y = rect.Top; y < rect.Bottom; y++)
    {
        for (int x = rect.Left; x < rect.Right; x++)
        {
            ColorBgra CurrentPixel = src[x,y];
            dst[x,y] = CurrentPixel;
        }
    }
}
Next, let's create our inner loops based on the desired outline width:
#region UICode
int Amount1 = 5; // [1,10] Outline Width
#endregion

void Render(Surface dst, Surface src, Rectangle rect)
{
    PdnRegion selectionRegion = EnvironmentParameters.GetSelection(src.Bounds);
    for (int y = rect.Top; y < rect.Bottom; y++)
    {
        for (int x = rect.Left; x < rect.Right; x++)
        {
            ColorBgra CurrentPixel = src[x,y];
            for (int TestY = y - Amount1; TestY <= y + Amount1; TestY++)
            {
                for (int TestX = x - Amount1; TestX <= x + Amount1; TestX++)
                {

                }
            }
            dst[x,y] = CurrentPixel;
        }
    }
}
And, finally, if we find that we are near the edge of the selection, replace the pixel with a red one.
#region UICode
int Amount1 = 5; // [1,10] Outline Width
#endregion

void Render(Surface dst, Surface src, Rectangle rect)
{
    PdnRegion selectionRegion = EnvironmentParameters.GetSelection(src.Bounds);
    for (int y = rect.Top; y < rect.Bottom; y++)
    {
        for (int x = rect.Left; x < rect.Right; x++)
        {
            ColorBgra CurrentPixel = src[x,y];
            for (int TestY = y - Amount1; TestY <= y + Amount1; TestY++)
            {
                for (int TestX = x - Amount1; TestX <= x + Amount1; TestX++)
                {
                    if (!selectionRegion.IsVisible(TestX, TestY))
                    {
                        CurrentPixel = ColorBgra.Red;
                    }
                }
            }
            dst[x,y] = CurrentPixel;
        }
    }
}
And, there you have it!
Just know that while it does work, this code is very slow. After all, it is checking LOTS of pixels for every pixel that is selected--many times more than once!
What you see above was basically the first version of my Selection > Outline plugin (with the added ability to select the replacement color). That is not the code of the plugin that is part of my pack. It was just too slow and doesn't offer to anti-alias the outline drawn. Well, since you are curious, here's the code of the plugin in my pack:
// Author: BoltBait
// Submenu: Selection
// Name: Outline Selection
// URL: http://www.BoltBait.com/pdn
#region UICode
int Amount1 = 5; // [1,10] Outline Width
ColorBgra Amount2 = ColorBgra.Red; // Outline Color
bool Amount3 = true; // Anti-alias
bool Amount4 = false; // Preserve canvas edges
#endregion

private UserBlendOps.NormalBlendOp normalOp = new UserBlendOps.NormalBlendOp();

// Make a pen
int[,] GetMatrix(int size)
{
    int newsize = size * 2 + 1;
    int[,] matrix = new int[newsize, newsize];
    for (int x=0;x<newsize;x++)
    {
        for (int y=0;y<newsize;y++)
        {
            double dist = Math.Sqrt(                                       //   ________
                ( ((double)size-(double)x) * ((double)size-(double)x) ) +  // \/ A² + B² = C
                ( ((double)size-(double)y) * ((double)size-(double)y) ) ); // Distance formula
            if (dist <= size)
            {
                // very close
                matrix[x,y] = 255;
            }
            else
            {
                if (dist >= (size + 1))
                {
                    // too far
                    matrix[x,y] = 0;
                }
                else
                {
                    // on the edge - Anti-alias
                    matrix[x,y] = (int)((double)255 * (1-(dist-(double)size)));
                    // on the edge - Aliased
                    if (!Amount3) matrix[x,y] = 255;
                }
            }
        }
    }
    return matrix;
}

unsafe void Render(Surface dst, Surface src, Rectangle rect)
{
    int[,] matrix = GetMatrix(Amount1);
    bool mergeAlpha;
    bool prevMerge;
    PdnRegion selectionRegion = EnvironmentParameters.GetSelection(src.Bounds);
    for (int y = rect.Top; y < rect.Bottom; y++)
    {
        ColorBgra* srcPtr = src.GetPointAddressUnchecked(rect.Left, y);
        ColorBgra* dstPtr = dst.GetPointAddressUnchecked(rect.Left, y);
        prevMerge = true;
        for (int x = rect.Left; x < rect.Right; x++)
        {
            byte newAlpha = 0;
            mergeAlpha = false;
            ColorBgra CurrentPixel = *srcPtr;
            // Preserve canvas edges
            if (!(Amount4 && ((x >= (src.Width - 1) - Amount1) || (y >= (src.Height - 1) - Amount1) || (x <= Amount1) || (y <= Amount1))))
            {
                for (int TestY = y - Amount1; TestY <= y + Amount1; TestY++)
                {
                    for (int TestX = (prevMerge)?x - Amount1:x + Amount1 - 1; TestX <= x + Amount1; TestX++)
                    {
                        if (!selectionRegion.IsVisible(TestX, TestY))
                        {
                            CurrentPixel = Amount2;

                            CurrentPixel.A = (byte)matrix[TestX - (x - Amount1), TestY - (y - Amount1)];
                            mergeAlpha = true;
                            if (CurrentPixel.A > newAlpha)
                            {
                                newAlpha = CurrentPixel.A;
                            }
                            else
                            {
                                CurrentPixel.A = newAlpha;
                            }
                        }
                    }
                }
            }
            if (mergeAlpha)
            {
                *dstPtr = normalOp.Apply(*srcPtr, CurrentPixel);
                prevMerge = true;
            }
            else
            {
                *dstPtr = CurrentPixel;
                prevMerge = false;
            }
            srcPtr++;
            dstPtr++;
        }
    }
}
There are two basic improvements in this version. First, it uses the GetMatrix function to create a round pen for drawing the outline. This gives a more natural shape to the outline drawn and gives the ability to draw an anti-aliased outline. Second, it attempts to skip checking lots of pixels in order to speed up the drawing.
The call to selectionRegion.IsVisible is very slow, so I attempt to call it only when necessary. How would I know if it is necessary? Glad you asked. I asked the same question and this is what Ed Harvey taught me: Basically, we are checking pixels, one after another, in a row. Therefore, the pixel we are checking is just to the right of the previous pixel checked. If the previous pixel checked was not near an edge and many of the surrounding pixels of our current pixel overlap with the previous pixel, we really don't need to recheck those surrounding pixels again. Here is an illustration of what I'm talking about:
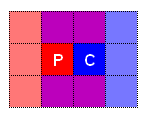
Notice in the picture, the surrounding pixels checked for the previous pixel (P) are shown in red. The surrounding pixels to the current pixel (C) are shown in blue. The pixels that are overlapping are shown in purple. Notice that if the previous pixel was not near an edge, only the leading edge (the right hand edge) of surrounding pixels need to be checked (shown in blue). This is a huge savings! Most of the changes in the inner loops is dealing with keeping track of this optimization.
More Examples
At this point you're probably hungry for more script examples. Well, more example scripts can be found here: Sample code for the various UI elements. Many of them are useful and some of them have explanations of how they work. I hope you find something there you like.
Conclusion
I hope you've learned something about how plugins are designed and written by reading this series of lessons and playing with CodeLab.
If you've made it this far and would like to say, "thank you" for all the hard work that went into collecting and developing this series, you can click the button below to buy me a beer.
Beyond CodeLab
Once you've mastered CodeLab and are ready to move on, you're ready for the next lesson:
How to Write an Effect Plugin (Part 5 of 4 - Beyond CodeLab)
More Information
Here is some more information that you may find useful:
CodeLab Effects Design Overview
Sample Code for User Interface Elements
Using the Code Editor
Designing a User Interface for Your Effect
Building a DLL File
CodeLab Help File
Check for CodeLab Updates
Learn C#
|
|
|
News
CodeLab 6.13 Released
(November 17, 2024)
This latest release of CodeLab for Paint.NET includes the
ability to write GPU accelerated plugins.
More...
Double-Six Dominoes 3.1
(May 10, 2021)
This long-awaited refresh of the most popular dominoes game
on Download.com is now available!
More...
HTML Editor 1.5 Released
(March 31, 2016)
This latest release is a complete rewrite adding a wysiwyg editor mode and a much improved UI.
More...
|
|
|
|
|
|