|
CodeLab Tutorial Part 5 - Beyond CodeLab
How to use Visual Studio to make Paint.NET plugins!
If you haven't already done so, please go back and review the following:
Part 1 - Simple
Part 2 - Intermediate
Part 3 - Complex
Part 4 - Odds & Ends
Back? OK, good. Now that you've mastered those lessons, what if CodeLab just isn't up to the task?
Part 5 - Beyond CodeLab
CodeLab is an awesome and powerful tool. It allows for easy prototyping and tinkering with code live as you type. It supports many features of the Paint.NET effect system. But, let's face it... it doesn't support ALL features of the Paint.NET Indirect UI system.
In order to keep the scripts easy to use, I had to make some sacrifices when it came to the features I supported.
For example, when using color selectors, the first color wheel defaults to the primary color and the second defaults to the secondary color as currently selected in the UI. This is usually very handy. But, what if you need the default colors to be Black and White? And, there are other features of Indirect UI that CodeLab doesn't support.
In this lesson, I will show you how to take a CodeLab script and import it into Visual Studio as a project in order to make changes necessary to go beyond CodeLab's built-in capabilities and explain how to use more Indirect UI features. What this lesson will not cover is Canvas plugins or FileType plugins.
If you have not already done so, you can download a free copy of Visual Studio at: https://visualstudio.microsoft.com/vs/express/ Just be sure to get the proper one for your platform. I suggest Express 2013 for Windows Desktop. I am currently using Visual Studio 2010 Ultimate, so if you use Express your screenshots will not match exactly.
In order to utilize the stuff taught in this lesson, you'll need a fully debugged CodeLab script. If you don't have a new one, you can always use one of the ones we've developed in previous lessons.
OK, now that you're ready to go, let's jump right in...
Slider Decorations
Starting with Paint.NET v4.0, Indirect UI built effects can have slider decorations. Slider decorations are colors in the actual slider itself... hmmm... a picture is worth a 1000 words... Here is a picture of the built-in Hue/Saturation adjustment from Paint.NET v4.0:
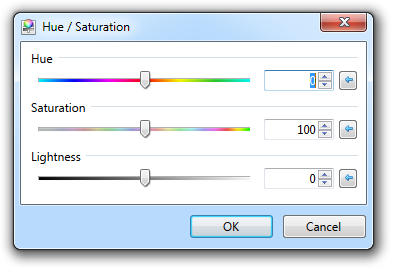
Notice the colorful channel decorations where the sliders move? You can add that capability to your own effects, just not in CodeLab.
Let's revisit the effect we built in Lesson 2 and I'll walk you through the process of adding colorful slider decorations to the Color Balance effect.
Before we begin, right-click on this image:  and save it to your computer. and save it to your computer.
Now, let's start with our final script from Lesson 2:
#region UICode
int Amount1=0;   //[-100,100]Cyan - Red
int Amount2=0;   //[-100,100]Magenta - Green
int Amount3=0;   //[-100,100]Yellow - Blue
#endregion

private byte Clamp2Byte(int iValue)
{
    if (iValue<0) return 0;
    if (iValue>255) return 255;
    return (byte)iValue;
}

void Render(Surface dst, Surface src, Rectangle rect)
{
    ColorBgra CurrentPixel;
    int R, G, B;
    for(int y = rect.Top; y < rect.Bottom; y++)
    {
        for (int x = rect.Left; x < rect.Right; x++)
        {
            CurrentPixel = src[x,y];
            R = (int)CurrentPixel.R;
            G = (int)CurrentPixel.G;
            B = (int)CurrentPixel.B;
            // Cyan - Red adjustment
            R = R + Amount1;
            G = G - (Amount1 / 2);
            B = B - (Amount1 / 2);
            // Magenta - Green adjustment
            G = G + Amount2;
            R = R - (Amount2 / 2);
            B = B - (Amount2 / 2);
            // Yellow - Blue adjustment
            B = B + Amount3;
            R = R - (Amount3 / 2);
            G = G - (Amount3 / 2);
            // Reassemble the color from R, G, and B
            CurrentPixel = ColorBgra.FromBgra(Clamp2Byte(B),Clamp2Byte(G),Clamp2Byte(R),CurrentPixel.A);
            dst[x,y] = CurrentPixel;
        }
    }
}
The first thing we'll need to do is move our code into a Visual Studio project.
Moving a CodeLab Script to Visual Studio
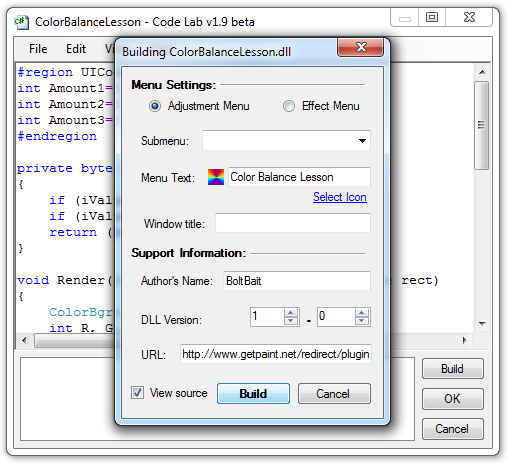
OK, run Paint.NET and go into CodeLab. Copy-and-paste the above script into the code window and make sure it runs without errors. When you are happy with the effect, click the CodeLab "File > Save..." menu and save the script to a file on your computer. Be sure to give it a unique name, like ColorBalanceLesson.cs. This is so that it won't interfere with any existing plugins.
Once the "cs" file is saved, click the "File > Build" menu. This will bring up the build window:
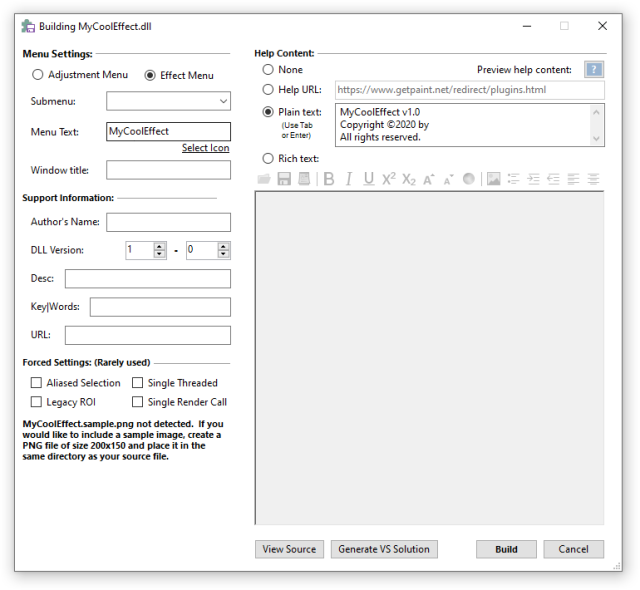
Click the "Select Icon" link and load the little image file () we saved to your computer earlier. You should now see it next to the Menu Text.
Verify that all the other items in the build window are correct, then: BE SURE TO CLICK THE "View Source" CHECK BOX!
Once that is done, click the Build button. If successful, you should see a box containing all the source code that CodeLab prepared for you.
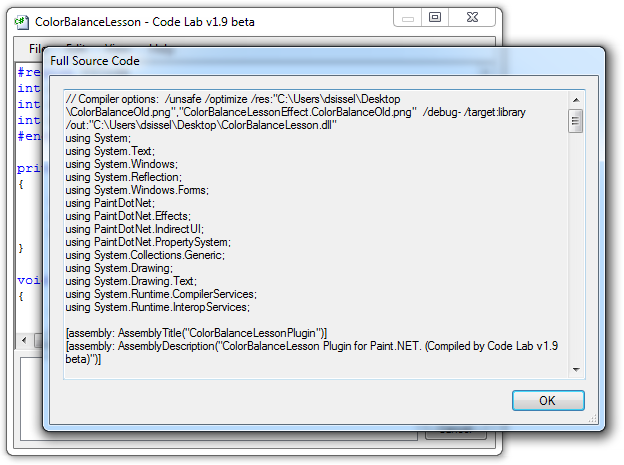
Click on that source code and press Ctrl-A (to select it all) and Ctrl-C (to copy it all).
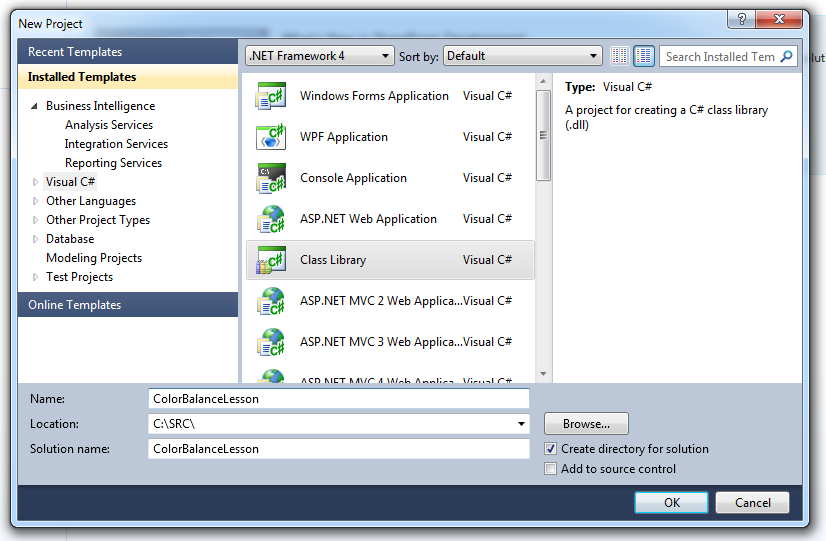
Next, run Visual Studio and click "File > New > Project". From the new project window, select "Visual C# > Class Library". Be sure to select .NET framework v4.0, then fill out the Name box with "ColorBalanceLesson" before pressing the OK Button.
After clicking the OK button, your project will be prepared for you and you'll see the source code of Class1:
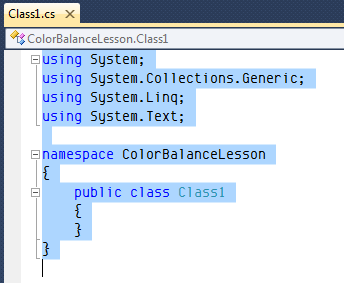
Select all of that source code and delete it.
Now, if you've been very careful, the CodeLab source code should still be on your clipboard. Paste that source code into that newly empty source code window of your project.
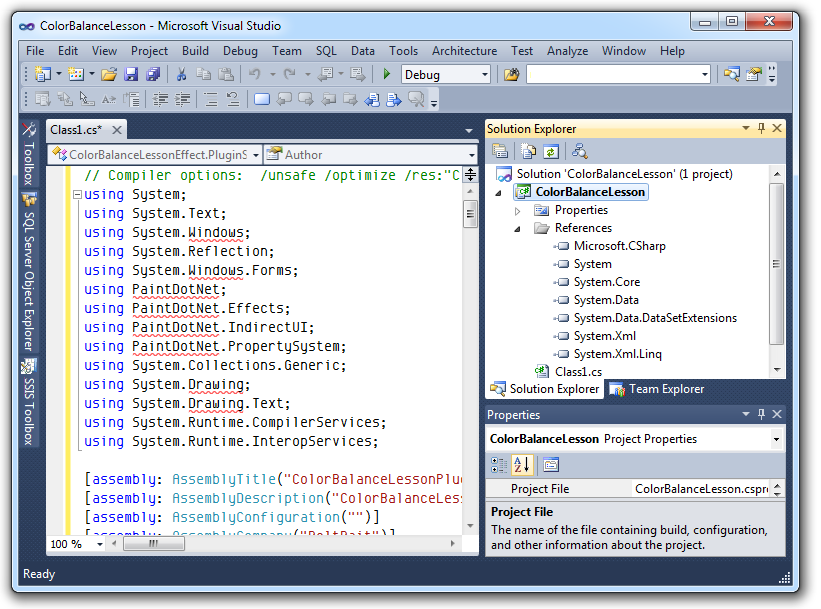
You'll see some red underlines in your code. This is because we need to fix up a few things before the project will build. Let's start with the project properties.
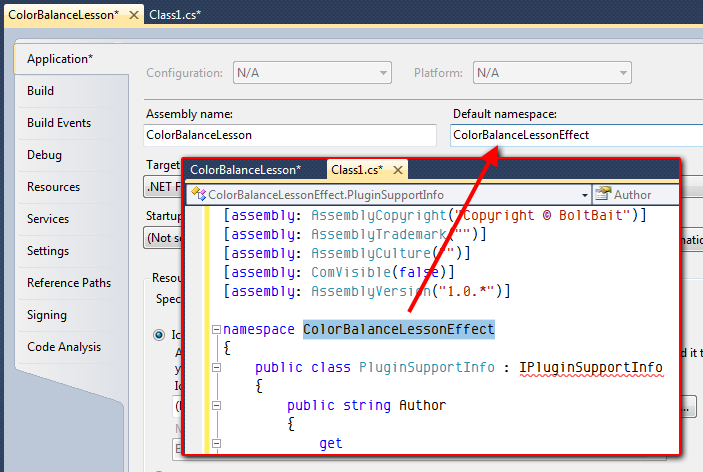
Click "Project > ColorBalanceLesson Properties". This will bring up the properties window. In the "Application" tab, click on the "Default Namespace" entry and make sure it matches EXACTLY the namespace listed in the Class1.cs window. You can freely click back and forth between the two windows.
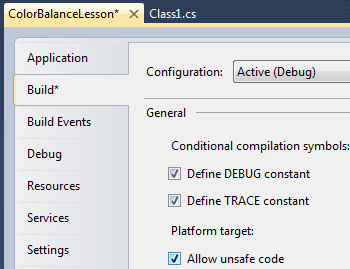
Next, click on the "Build" tab and make sure "Allow unsafe code" is checked.
At this point, do a "File > Save All" and go ahead and close the properties window. You should now be back to the code window.
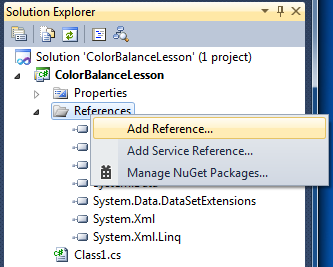
Go to your solution window and right-click on "References" and select "Add Reference":
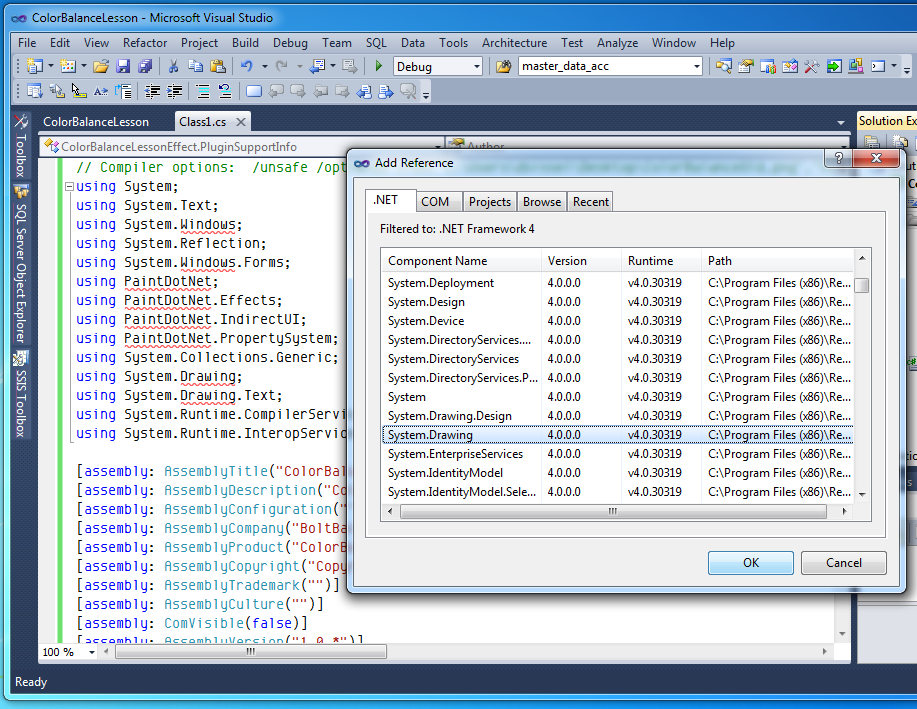
In the Add Reference window, click the ".NET" tab and scroll down to find "System.Drawing". Select it and click OK.
Repeat this process for "System.Windows.Forms".
Next, add another reference to your project, but this time click the "Browse" tab. Browse over to the "C:\Program Files\Paint.NET\" folder.
Select the file "PaintDotNet.Effects.DLL" file. Then, Ctrl-Click on "PaintDotNet.Core.DLL", "PaintDotNet.Data.DLL", and "PaintDotNet.Base.DLL". Click OK to add these references to your project. This should cause all red underlines to disappear from your project. We're nearly ready to build.
Next, right-click on your project and choose "Add > Existing Item" from the menu:

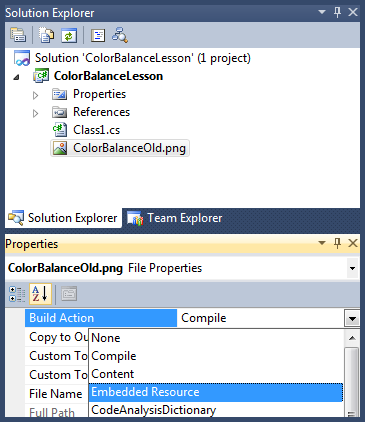
In the file explorer box, under file types, select "All files" and in the files area click on the little icon file that we downloaded earlier and press the OK button. Now that it is included in your project, click on it in the Solution Explorer window and change the Build Action to "Embedded Resource".
Finally, right-click on the "AssemblyInfo.cs" file in the Project Explorer window and delete it.
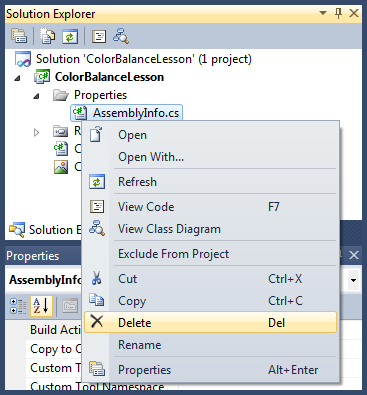
We won't need this file as the Class1.cs file already includes the assembly info.
Do a "File > Save All" and we're ready to build!
Click "Build > Rebuild Solution". Verify that everything builds without errors. If there are errors, you'll have to figure those out before continuing.
Whew! Are you ready to add the slider decorations yet?!
Specifying Slider Decorations
Go to the Class1.cs window and search for the OnCreateConfigUI code. In that function, you should see the following lines that sets up the sliders:
configUI.SetPropertyControlValue(PropertyNames.Amount1, ControlInfoPropertyNames.DisplayName, "Cyan - Red");
configUI.SetPropertyControlValue(PropertyNames.Amount2, ControlInfoPropertyNames.DisplayName, "Magenta - Green");
configUI.SetPropertyControlValue(PropertyNames.Amount3, ControlInfoPropertyNames.DisplayName, "Yellow - Blue");
We need to add a few lines to describe the colors we want behind each of those sliders. After each line specifying the control's display name, add a line describing the color you want for the background of that slider. After adding 3 new lines, the code should look like this:
configUI.SetPropertyControlValue(PropertyNames.Amount1, ControlInfoPropertyNames.DisplayName, "Cyan - Red");
configUI.SetPropertyControlValue(PropertyNames.Amount1,ControlInfoPropertyNames.ControlColors,new ColorBgra[] { ColorBgra.Cyan, ColorBgra.Red });
configUI.SetPropertyControlValue(PropertyNames.Amount2, ControlInfoPropertyNames.DisplayName, "Magenta - Green");
configUI.SetPropertyControlValue(PropertyNames.Amount2,ControlInfoPropertyNames.ControlColors,new ColorBgra[] { ColorBgra.Magenta, ColorBgra.Green });
configUI.SetPropertyControlValue(PropertyNames.Amount3, ControlInfoPropertyNames.DisplayName, "Yellow - Blue");
configUI.SetPropertyControlValue(PropertyNames.Amount3,ControlInfoPropertyNames.ControlColors,new ColorBgra[] { ColorBgra.Yellow, ColorBgra.Blue });
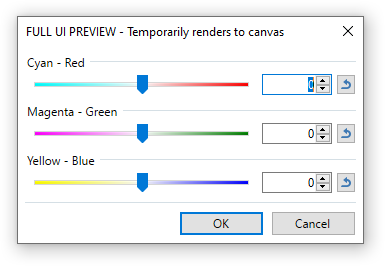
Do a "File > Save All" and then build with "Build > Rebuild Solution".
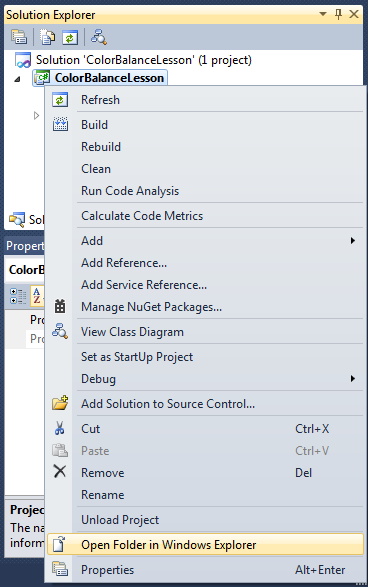
If it builds without error, right-click on the project and pick "Open folder in windows explorer":
From here, double click on the "Bin" folder then double-click on the "Debug" or "Release" folder (depending on what you built, usually debug) and find your "ColorBalanceLesson.dll" file. Copy that file to your Paint.NET Effects folder and rerun Paint.NET to test your new effect. You should now see the colorful slider decorations.
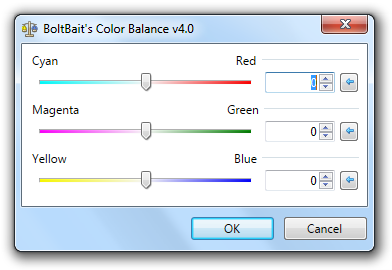
More Than 2 Colors
Astute observers will have noticed in the above image that the sliders have white in the center. The background colors for the slider decorations are specified in a color array. This array can be used to specify 2, 3, or more colors. So, in order to specify the first slider above, just include Cyan to start, White in the middle, and end it with Red:
configUI.SetPropertyControlValue(PropertyNames.Amount1,ControlInfoPropertyNames.ControlColors,new ColorBgra[] { ColorBgra.Cyan, ColorBgra.White, ColorBgra.Red });
Built-In Slider Decorations
There are several built-in slider decorations which are used by the built-in Hue/Saturation effect. They can be specified this way:
Instead of specifying control colors:
configUI.SetPropertyControlValue(PropertyNames.Amount1,ControlInfoPropertyNames.ControlColors,new ColorBgra[] { ColorBgra.Cyan, ColorBgra.Red });
Specify a control style:
configUI.SetPropertyControlValue(PropertyNames.Amount1,ControlInfoPropertyNames.ControlStyle,SliderControlStyle.HueCentered);
configUI.SetPropertyControlValue(PropertyNames.Amount2,ControlInfoPropertyNames.ControlStyle,SliderControlStyle.SaturationHue);
Sliders that Wrap
Some sliders, like the Hue slider, wrap their values when you reach the limit of the slider. Try it: Move the hue slider all the way to the right and now click the up arrow. The slider moves all the way to the left to continue moving over the hue range. You can make your own sliders wrap by specifying it this way:
configUI.SetPropertyControlValue(PropertyNames.Amount1,ControlInfoPropertyNames.RangeWraps,true);
Other Indirect UI Rules
Simon Brown wrote a nice tutorial explaining how to use some of the other rules available in Indirect UI here: https://www.isimonbrown.co.uk/using-indirectui-rules/
Debugging your Plugin
Now that your plugin is in Visual Studio instead of CodeLab, you have access to all of Visual Studio's debug facilities. Follow these instructions to debug your Paint.NET plugin using Visual Studio.
Conclusion
I hope you've learned something about how plugins are designed and written in CodeLab and finished off in Visual Studio.
If you've made it this far and would like to say, "thank you" for all the hard work that went into collecting and developing this series, you can click the button below to buy me a beer.
More Information
Here is some more information that you may find useful:
CodeLab Effects Design Overview
Sample Code for User Interface Elements
Using the Code Editor
Designing a User Interface for Your Effect
Building a DLL File
CodeLab Help File
Check for CodeLab Updates
Learn C#
|
|
|
News
CodeLab 6.12 Released
(February 11, 2024)
This latest release of CodeLab for Paint.NET includes the
ability to write GPU accelerated plugins.
More...
Double-Six Dominoes 3.1
(May 10, 2021)
This long-awaited refresh of the most popular dominoes game
on Download.com is now available!
More...
HTML Editor 1.5 Released
(March 31, 2016)
This latest release is a complete rewrite adding a wysiwyg editor mode and a much improved UI.
More...
|
|
|
|
|
|