|
CodeLab Tutorial Part 1 - Simple
How to create CodeLab plugins that do not require a UI
This tutorial was written in response to the following PM that I received:
From: FireFly
I know enough (says "pyro" who reviewed some of my code) C# to start making some simple plugins using codelab, but I have absolutely know idea where to start. I attempted to make a 'dot at center' (off enormators effects) because it sounded the easiest. Could you suggest an easier one to start with? If you could offer any other help, it would also be appreciated.
Thanks, FireFly.
Here is my response:
So, you want to learn how to write your own Paint.NET plugin? Cool. I'll show you how it's done.
In order to follow along with this series of tutorials, you'll need to install the CodeLab plugin and you'll need at least a basic understanding of the C#.NET programming language. If you have experience with C, C++, or Pascal, you'll probably do fine. If not, you'll need to get familiar with C# first. Go ahead, I'll wait...
Ready to start? OK, let's go...
NOTE: Before we begin, be sure to read the Overview page as it explains the basic purpose of effect plugins and how Paint.NET works with plugins.
When starting an effect plugin, the first thing you'll need is an idea for what you want your plugin to do. Generally, you'll have some problem or set of steps you find yourself repeating over and over again. These are good candidates for problems you can solve with an effect plugin.
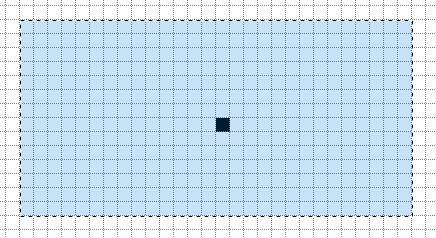
For the purposes of this first tutorial, we will create an effect that places a single black dot at the center of our current selection. This is useful for when you need to know the exact center of your selection when drawing lines or other shapes and you want them to be centered. I chose this effect because it does not require any user interface (UI) controls. We will tackle UI controls in Lesson 2.
Recall, in the Overview, when creating an effect plugin using CodeLab, you only need to write the Render() function and I told you that we even had a template to get you started. Let's open Paint.NET and run CodeLab to see that template.
To create our "Dot at Center" plugin, let's start with CodeLab's default script:
// Name:
// Submenu:
// Author:
// Title:
// Version:
// Desc:
// Keywords:
// URL:
// Help:
#region UICode
IntSliderControl Amount1 = 0; // [0,100] Slider 1 Description
IntSliderControl Amount2 = 0; // [0,100] Slider 2 Description
IntSliderControl Amount3 = 0; // [0,100] Slider 3 Description
#endregion

void Render(Surface dst, Surface src, Rectangle rect)
{
    // Delete any of these lines you don't need
    Rectangle selection = EnvironmentParameters.SelectionBounds;
    int centerX = ((selection.Right - selection.Left) / 2) + selection.Left;
    int centerY = ((selection.Bottom - selection.Top) / 2) + selection.Top;
    ColorBgra primaryColor = EnvironmentParameters.PrimaryColor;
    ColorBgra secondaryColor = EnvironmentParameters.SecondaryColor;
    int brushWidth = (int)EnvironmentParameters.BrushWidth;

    ColorBgra currentPixel;
    for (int y = rect.Top; y < rect.Bottom; y++)
    {
        if (IsCancelRequested) return;
        for (int x = rect.Left; x < rect.Right; x++)
        {
            currentPixel = src[x,y];
            // TODO: Add pixel processing code here
            // Access RGBA values this way, for example:
            // currentPixel.R = primaryColor.R;
            // currentPixel.G = primaryColor.G;
            // currentPixel.B = primaryColor.B;
            // currentPixel.A = primaryColor.A;
            dst[x,y] = currentPixel;
        }
    }
}
Looking at the default script, you'll notice that inside the nested x,y loops, the script reads a pixel from the src surface and stores it in the currentPixel variable. Then, it writes that pixel to the dst surface. The script is copying all pixels directly from the source surface (src) to the destination canvas (dst) without modifying that pixel at all. Effectively, it does nothing.
Starting with this script, let's make the necessary changes to implement our "Dot at Center" effect.
At the top of the script, you can see the following lines:
// Name:
// Submenu:
// Author:
// Title:
// Version:
// Desc:
// Keywords:
// URL:
// Help:
#region UICode
IntSliderControl Amount1 = 0; // [0,100] Slider 1 Description
IntSliderControl Amount2 = 0; // [0,100] Slider 2 Description
IntSliderControl Amount3 = 0; // [0,100] Slider 3 Description
#endregion
As mentioned before, we won't be needing a UI for this effect, so go ahead and delete all those lines.
Looking inside of our Render() function, we won't be needing the primary, secondary color, or the brush width, so go ahead and delete these lines:
ColorBgra primaryColor = EnvironmentParameters.PrimaryColor;
ColorBgra secondaryColor = EnvironmentParameters.SecondaryColor;
int brushWidth = (int)EnvironmentParameters.BrushWidth;
We WILL be needing to know the center of our selection so KEEP these lines:
Rectangle selection = EnvironmentParameters.SelectionBounds;
int centerX = ((selection.Right - selection.Left) / 2) + selection.Left;
int centerY = ((selection.Bottom - selection.Top) / 2) + selection.Top;
Finally, we will modify the inner loop so that it copies all pixels from the source canvas to the destination canvas unless we are working on the center pixel. In that case, we will be replacing that pixel with one that is black.
As the effect loops through all of the pixels on the destination canvas, we know when we are working on the center pixel if the y variable is equal to "centerY" and the x variable is equal to "centerX". In C# that condition looks like this:
if (y == centerY && x == centerX)
{

}
We will replace the "// comments" in our default script with that condition code, so it looks like this now:
void Render(Surface dst, Surface src, Rectangle rect)
{
    // Delete any of these lines you don't need
    Rectangle selection = EnvironmentParameters.SelectionBounds;
    int centerX = ((selection.Right - selection.Left) / 2) + selection.Left;
    int centerY = ((selection.Bottom - selection.Top) / 2) + selection.Top;

    ColorBgra currentPixel;
    for (int y = rect.Top; y < rect.Bottom; y++)
    {
        if (IsCancelRequested) return;
        for (int x = rect.Left; x < rect.Right; x++)
        {
            currentPixel = src[x,y];
            // TODO: Add pixel processing code here
            if (y == centerY && x == centerX)
            {

            }
            dst[x,y] = currentPixel;
        }
    }
}
Finally, when that condition is true and we're working on the center pixel, we need to replace it with a black pixel. We can do that this way:
currentPixel = ColorBgra.Black;
Putting that all together, your final script should look like this:
void Render(Surface dst, Surface src, Rectangle rect)
{
    Rectangle selection = EnvironmentParameters.SelectionBounds;
    int centerX = ((selection.Right - selection.Left) / 2) + selection.Left;
    int centerY = ((selection.Bottom - selection.Top) / 2) + selection.Top;

    ColorBgra currentPixel;
    for (int y = rect.Top; y < rect.Bottom; y++)
    {
        if (IsCancelRequested) return;
        for (int x = rect.Left; x < rect.Right; x++)
        {
            currentPixel = src[x,y];
            if (y == centerY && x == centerX)
            {
                currentPixel = ColorBgra.Black;
            }
            dst[x,y] = currentPixel;
        }
    }
}
That's it!
If you think about it, the only thing we actually needed to write ourselves to implement the "Dot at Center" algorithm was this part:
if (y == centerY && x == centerX)
{
    currentPixel = ColorBgra.Black;
}
Everything else was written for you by CodeLab.
Now that you have built your first effect, if you'd like to make it a permanent part of Paint.NET, just follow the steps on the Building a DLL File page.
Now that you've finished the first lesson, you're probably ready for part 2:
How to Write an Effect Plugin (Part 2 of 4 - Intermediate)
More Information
Here is some more information that you may find useful:
CodeLab Effects Design Overview
Sample Code for User Interface Elements
Using the Code Editor
Designing a User Interface for Your Effect
Building a DLL File
CodeLab Help File
Check for CodeLab Updates
Learn C#
|
|
|
News
Sudoku 1.1 Released
(October 19, 2025)
Solve sudoku puzzles for fun! Over 280 puzzles at all levels included.
More...
CodeLab 6.13 Released
(November 17, 2024)
This latest release of CodeLab for Paint.NET includes the
ability to write GPU accelerated plugins.
More...
Double-Six Dominoes 3.1
(May 10, 2021)
This long-awaited refresh of the most popular dominoes game
on Download.com is now available!
More...
|
|
|
|
|
|